
Why Lighting Matters in Car Photography: A Pro Guide
June 22, 2026
Lighting is the single most critical factor in car photography because it defines a vehicle’s form, color accuracy, and surface detail in every frame. Without controlled light, even the most exotic Ferrari or Lamborghini reads as a flat, lifeless object on screen. The importance of lighting in car photography goes far beyond simple exposure. Light sculpts curves, reveals panel transitions, and controls how paint color registers on the sensor. Understanding why lighting matters in car photography separates snapshots from images that stop people mid-scroll.
Why does lighting matter so much in car photography?
Light does not just illuminate a car. It builds the image. Every highlight and shadow on a vehicle’s body communicates shape, depth, and material quality to the viewer’s eye. Shadow separates surfaces and allows the eye to interpret volume and layering on complex body panels. Without that separation, a sculpted hood or a flowing fender line disappears into a gray, featureless mass.
Paint finish compounds the challenge. Metallic, pearl, and matte finishes each react differently to the same light source. A metallic silver paint can shift from rich and dimensional to washed out depending on the angle and quality of light hitting it. Proper lighting preserves true paint color across all finish types, which is why professional automotive photographers treat light placement as a primary technical decision, not an afterthought.
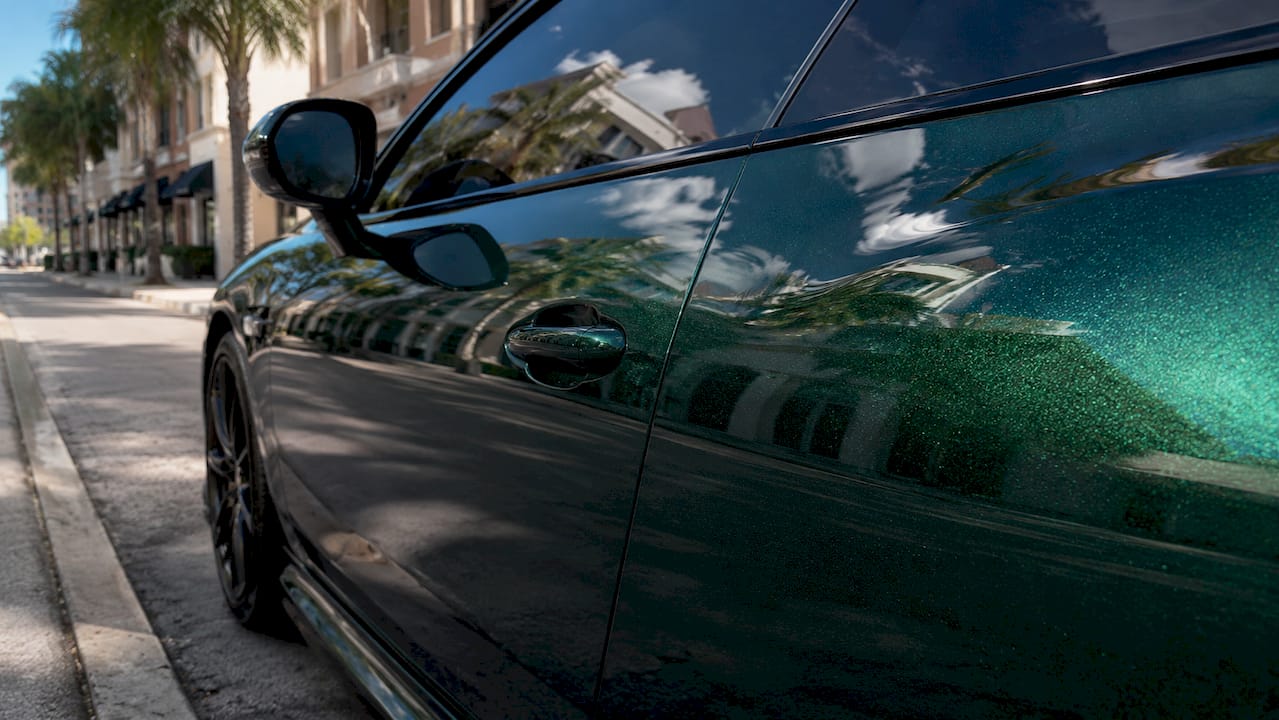
Reflections add another layer of complexity. Cars act as giant curved mirrors reflecting everything around them, including the sky, buildings, trees, and the photographer. Managing those reflections is as important as choosing the light source itself. The best lighting setups account for what the car will reflect, not just what hits it directly.
How do different natural lighting conditions affect car photos?
Natural light is free, powerful, and highly variable. Knowing which conditions serve car photography and which destroy it is a foundational skill.
Overcast skies: the natural softbox
An overcast sky acts as a giant softbox, wrapping the vehicle in even, diffused illumination with no harsh shadows or bright hotspots. This condition is preferred for technical accuracy shots, where true color reproduction and clean surface detail matter most. Dealership inventory photography benefits enormously from overcast conditions because every panel reads clearly and consistently.
Golden hour: the hero shot window
Golden hour light is warm, directional, and sculpts shapes beautifully. The low sun angle creates long, dramatic shadows that define body lines and add visual energy to the image. The limitation is real: golden hour offers roughly 60 minutes per day for usable hero shots, which demands serious preparation. Arriving early, pre-positioning the vehicle, and confirming camera settings before the light arrives is non-negotiable.
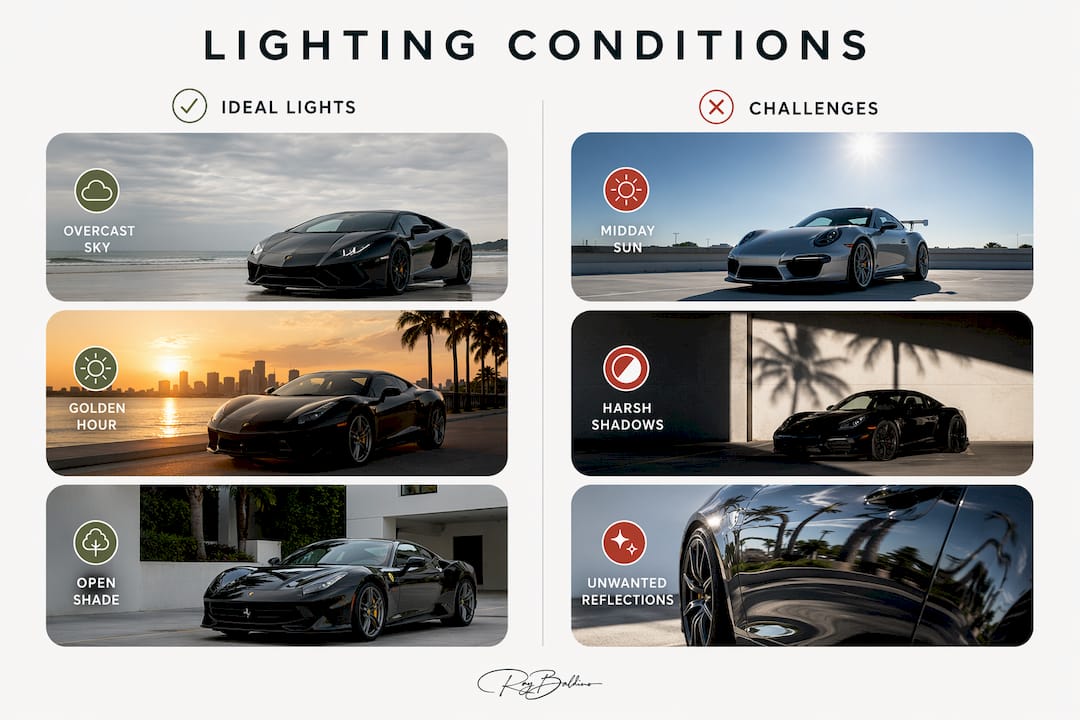
Midday sun: the condition to avoid
Midday sun is the most damaging natural light for car photography. Harsh midday light creates hotspots and strong reflections that degrade both detail and color fidelity. The high angle punches bright spots onto hoods and roofs while throwing deep, unflattering shadows under bumpers and door sills. Avoiding midday shoots is the simplest way to immediately improve image quality.
Open shade: the underrated option
Open shade, such as the shadow side of a building or a tree line, provides diffused light without the color cast of an overcast sky. It reduces harsh reflections and gives photographers a controlled environment for detail shots of wheels, interiors, and badging. Open shade works particularly well when golden hour is not available and the sky is clear.
| Lighting Condition | Quality | Best Use | Key Limitation |
|---|---|---|---|
| Overcast sky | Soft, even | Technical accuracy, inventory | Flat mood, low drama |
| Golden hour | Warm, directional | Hero and lifestyle shots | Only ~60 minutes per day |
| Midday sun | Harsh, high contrast | Avoid for most car work | Hotspots, blown highlights |
| Open shade | Diffused, neutral | Detail shots, interiors | Limited availability |
Pro Tip: Scout your location the day before a golden hour shoot. Walk the exact spot at the same time of day, note where the sun falls on the vehicle’s position, and mark your camera placement. Those 60 minutes go fast.
How do you control lighting and reflections in car photography?
Reflection control is where car photography diverges sharply from portrait or product photography. A car’s curved, polished surfaces pick up and display everything in the environment. Controlling what the car reflects is as critical as controlling the light source itself.
Using circular polarizers outdoors
A circular polarizer is one of the most effective tools in outdoor car photography. Polarizers cut sky glare that washes out paint color and reduce unwanted reflections from surrounding surfaces. Rotating the polarizer while looking through the viewfinder lets you dial in exactly how much reflection you want to suppress. The result is richer, more saturated paint color and cleaner surface reads.
Positioning the vehicle and photographer
Longer focal lengths help hide the photographer’s reflection in the vehicle’s panels. Shooting from 70mm to 200mm compresses perspective and keeps the camera further from the car’s surface. Positioning the vehicle so that it reflects a clean sky, a neutral wall, or a managed background eliminates distracting elements before any post-processing begins.
Key tools and techniques for reflection control:
- Circular polarizer: Reduces sky glare and saturates paint color on outdoor shoots
- Strobes and LEDs: Provide controlled, repeatable light in studio or shaded environments
- Softboxes and strip lights: Shape and direct artificial light precisely onto body panels
- Longer focal lengths (70mm–200mm): Reduce photographer reflection and compress background
- Tripod: Allows lower ISO and smaller aperture settings that complement controlled lighting
Pro Tip: In a studio setup, hang large pieces of white or black fabric around the car to control what the panels reflect. White fabric adds fill light. Black fabric creates separation and depth between panels.
Why is lighting considered sculpture in automotive photography?
The most experienced automotive photographers do not think about light as illumination. They think about it as structure. Light is not just illumination. It’s structure that sculpts and reveals the car’s form. That shift in thinking changes every decision made on a shoot.
“Directional light creates gradients and shadows that articulate a car’s complex form, making lighting a sculptural art.” — How to photograph cars like a sculptor using light and shadow
The sculptural approach to lighting works through four principles:
- Light gradients define curvature. A smooth gradient from highlight to shadow across a fender communicates the panel’s radius to the viewer. Without that gradient, the fender looks flat.
- Shadow creates separation. Where one panel meets another, a shadow line tells the eye that two distinct surfaces exist. Remove the shadow and the design detail disappears.
- Hard vs. soft light sets the mood. Hard light from a direct source creates sharp shadow edges that emphasize aggressive, angular designs. Soft light from a large source wraps curves and suits elegant, flowing body styles.
- Shadow placement is a choice. The most common mistake is treating cars like static objects and ignoring shadow placement entirely. Beginners expose for the highlights and accept whatever shadows fall. Professionals place the light so the shadows land exactly where they reveal the design.
The practical result of thinking sculpturally is that you stop chasing “good exposure” and start chasing “good form.” Those are very different goals, and only one of them produces images that communicate a car’s design intent.
Practical tips for better car photos through smarter lighting
Improving car photography does not require expensive equipment. Consistency in lighting and controlling the environment outweigh having high-end gear in harsh or unmanaged light. The following practices apply whether you are shooting with a mirrorless camera or a smartphone.
- Plan around the light, not the car. Decide your lighting condition first, then position the vehicle to work within it. Chasing a parked car around a lot to find good light wastes time and rarely works.
- Choose clean, uncluttered backgrounds. Busy backgrounds compete with the car and amplify unwanted reflections. A plain wall, an empty road, or a managed studio backdrop keeps attention on the vehicle.
- Use reflectors in natural light. A simple white foam board or a collapsible reflector bounces fill light into shadow areas without introducing new light sources or color casts.
- Handle midday light with shade or cloud cover. If you must shoot at midday, find a large shaded area such as a parking structure or a north-facing wall. The quality difference compared to direct sun is immediate.
- Match camera settings to your lighting condition. For static shots, f/8–f/11 at ISO 100 delivers maximum sharpness and clean color. For rolling shots, a shutter speed around 1/100s introduces natural motion blur in the wheels while keeping the body sharp.
- Shoot in RAW format. RAW files preserve far more tonal information than JPEGs, giving you room to recover highlights and lift shadows in post without degrading image quality.
Learning three-point lighting for automotive photography is one of the fastest ways to move from inconsistent results to repeatable, professional-quality images. That structure applies equally to studio setups and managed outdoor environments.
Key Takeaways
Lighting is the defining variable in car photography because it controls form, color accuracy, reflection, and mood simultaneously.
| Point | Details |
|---|---|
| Light sculpts form | Shadows and gradients reveal body panel curvature and design detail. |
| Overcast beats midday | Even, diffused overcast light produces more accurate color than harsh midday sun. |
| Reflections require management | Polarizers, focal length choice, and positioning control what the car reflects. |
| Sculptural thinking wins | Placing shadows intentionally separates surfaces and communicates vehicle design. |
| Gear matters less than environment | Consistent, managed light outperforms expensive equipment in poor conditions. |
What 35 years behind the lens taught me about light
After more than three decades photographing luxury and exotic vehicles for over 550 magazine covers, I can tell you that the single biggest gap between amateur car photos and professional ones is not the camera body or the lens. It is the photographer’s relationship with light.
Most beginners see light as a problem to solve. Too bright here, too dark there. They expose for the middle and hope for the best. What I learned early, and what took years to fully internalize, is that light is the subject. The car is the canvas. When I position a vehicle for a shoot, I am not thinking about the car first. I am thinking about where the light falls, where the shadows land, and what those shadows will say about the car’s design.
The photographers I see struggle most are the ones who invest in better cameras before they invest in understanding light. A $6,000 camera body in flat, unmanaged light produces a flat, unmanaged image. A disciplined approach to light, even with modest gear, produces images that hold attention. Patience and environment control are the real tools of this craft.
My advice to anyone serious about car photography: spend one full session shooting the same vehicle in three different lighting conditions. Overcast morning, open shade at noon, golden hour at dusk. Compare the results side by side. That exercise teaches more about the effects of lighting in car photography than any tutorial can.
— Ray
Baldinoautomotive: where lighting discipline meets automotive expertise
Baldinoautomotive brings over 35 years of controlled lighting expertise to every automotive shoot, from dealership inventory to private collector vehicles and commercial campaigns. Ray Baldino’s work, certified by the Professional Photographers of America and featured on more than 550 magazine covers, reflects a disciplined approach to light that produces images with genuine visual authority.
For photographers and dealerships ready to see what managed lighting actually produces, the full breakdown of how automotive photography works covers the process from location scouting to final delivery. Dealerships looking for consistent, high-quality results can also review what professional dealership photography looks like when lighting is treated as a primary discipline, not an afterthought.
FAQ
What is the best lighting for car photos?
Overcast skies provide the most technically accurate and consistent light for car photography by eliminating harsh shadows and hotspots. Golden hour is preferred for hero and lifestyle shots when dramatic, directional light is the goal.
How does lighting affect car photography quality?
Lighting controls form perception, paint color accuracy, and reflection content in every image. Poor lighting flattens body panel detail and introduces unwanted glare that obscures design lines.
How do I reduce reflections in car photography?
Use a circular polarizer outdoors to cut sky glare, shoot with a longer focal length to keep the camera out of the car’s reflection zone, and position the vehicle so it reflects a clean, neutral background.
Is expensive gear necessary for good car photography lighting?
Consistent, managed light produces better results than expensive equipment used in harsh or uncontrolled conditions. A simple reflector and an overcast sky outperform a high-end strobe kit used at midday without preparation.
Why do shadows matter in automotive photography?
Shadows separate adjacent body panels and communicate curvature to the viewer. Without intentional shadow placement, complex vehicle designs appear flat and lose the visual depth that makes them compelling.
Recommended
- Three-Point Lighting for Automotive Photography Explained
- How Automotive Photography Works Explained for Photographers

