
Three-Point Lighting for Automotive Photography Explained
June 10, 2026
Three-point lighting in automotive photography is a studio technique using three distinct light sources — a key light, fill light, and rim light — to sculpt a vehicle’s shape, control reflections, and separate it visually from the background. Unlike portrait or product photography, car photography demands precise reflection management because paint, glass, and chrome surfaces act as mirrors. The three-point lighting setup gives photographers deliberate control over what those surfaces reflect, which determines whether the final image looks dimensional and intentional or flat and cluttered. Tools like softboxes, black flags, and polarizing filters all play supporting roles within this system.
What is three-point lighting in automotive photography?
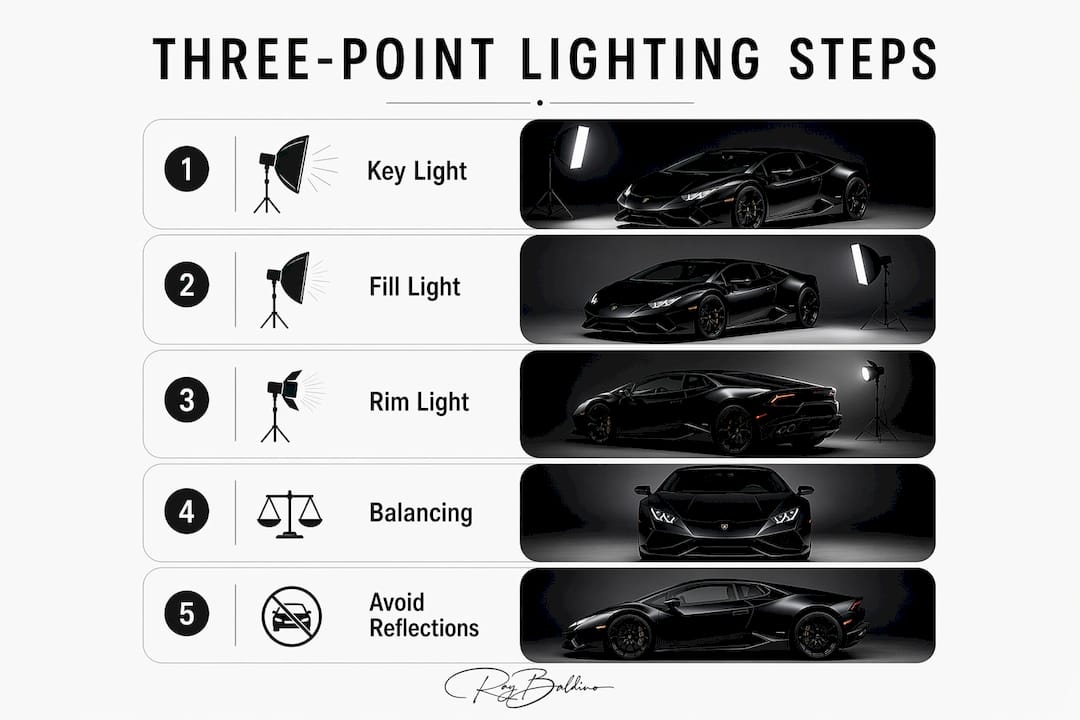
Three-point lighting uses three lights: a key light to define the primary illumination and main reflections, a fill light to soften shadows without eliminating them, and a rim light positioned behind the vehicle to outline its edges against the background. Each light solves a specific problem. The key light sets the dominant shadow structure across the car’s body panels. The fill light adjusts how dark those shadows appear. The rim light creates the separation and depth that make the car read as a three-dimensional object rather than a flat silhouette.
In automotive photography, the industry also refers to this approach as a “three-light studio setup,” and both terms describe the same foundational method. The technique originated in portrait and film lighting but has been adapted extensively for automotive studio photography because of how differently reflective surfaces behave compared to skin or fabric. Understanding this distinction is what separates technically sound car images from amateur snapshots.
How does each light in the setup function?
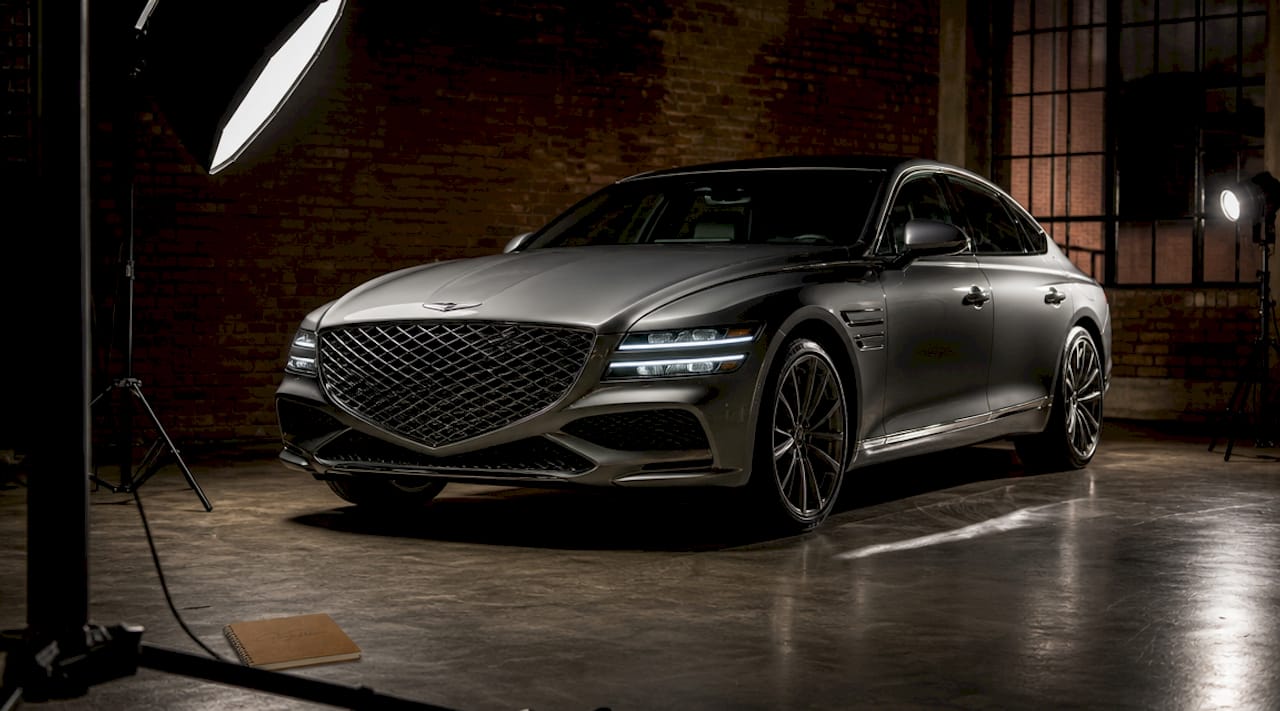
The key light is the primary source. Placed at roughly 45 degrees to the front of the vehicle, it defines the dominant highlight shape across the hood, roof, and front quarter panel. Its position determines where the brightest reflection falls on the car’s paint, which is why placement decisions matter more than raw power output. A large softbox positioned high and to one side creates a broad, smooth highlight that reads as clean and deliberate on a glossy surface.
The fill light sits on the opposite side of the key at a lower intensity. Its purpose is to reduce the harshness of shadows cast by the key without creating a competing reflection. Fill light intensity is typically set at 50% of the key light’s output for a natural result, with lower ratios producing more dramatic contrast. The fill light should never match the key in brightness.
- Key light: Placed at 45 degrees, defines primary reflections and shadow structure
- Fill light: Positioned opposite the key at reduced intensity, softens shadow depth
- Rim light: Placed behind the vehicle, creates an edge highlight that separates the car from the background
- Softboxes: Used on key and fill positions to produce broad, smooth reflections on paint
- Flags: Positioned to block stray light and prevent unwanted reflections on glass or chrome
The rim light creates separation by outlining the car’s rear edges with a thin strip of light. Without it, dark-colored vehicles especially tend to merge visually with the studio background. The rim light is typically positioned behind and slightly above the vehicle, aimed toward the camera, and set at a brightness level that produces a visible edge without causing lens flare.
Pro Tip: Never set your fill light equal in intensity to your key light. Matching fill light intensity to the key produces flat, lifeless images. Fill should be significantly dimmer to preserve depth, particularly on reflective subjects like cars.
Why is three-point lighting especially important for car photography?
Cars present a unique challenge that most photography subjects do not. Paint, glass, and chrome are all highly reflective surfaces, and they do not simply absorb light. They mirror everything in the studio environment, including light stands, cameras, walls, and the photographer. Controlling reflections is as important as controlling exposure when photographing vehicles.
Three-point lighting addresses this challenge through deliberate placement. Here is why the technique is particularly suited to automotive work:
- Reflection sculpting: The key light’s position determines the primary reflection shape on the car’s hood and doors. A well-placed key creates one clean, broad highlight rather than multiple fragmented ones.
- Shadow management: The fill light prevents the shadow side of the car from going completely dark, which would lose panel detail and surface texture.
- Edge definition: The rim light outlines the car’s profile, giving it visual weight and separating it from the background in a way that reads immediately to the viewer.
- Depth perception: Together, the three lights create tonal variation across the car’s body that communicates its three-dimensional form to a two-dimensional image.
- Consistency: Planning light placement before shooting reduces surprises on set and produces repeatable results across multiple vehicles or angles.
Pro Tip: Before placing any light, identify the three or four panels you most want to feature — typically the hood, front quarter, and door. Design your key light to create one intentional highlight shape across those panels first, then build the fill and rim around that decision.
How to balance light intensity ratios for car photography
Getting the ratio between key, fill, and rim lights right is where most beginners struggle. The numbers are straightforward, but the execution requires careful observation of how the car’s surfaces respond.
A 2:1 key-to-fill ratio produces a natural, dimensional result with visible shadow detail. A 3:1 ratio increases contrast and creates a more dramatic, editorial look. A 1:1 ratio flattens the image and removes the sense of depth entirely. For most automotive work, the 2:1 range is the starting point, with adjustments made based on the vehicle’s color and finish.
- 2:1 ratio: Natural contrast, recommended for most commercial and dealership work
- 3:1 ratio: Dramatic shadow depth, suited for editorial and performance vehicle shoots
- 1:1 ratio: Flat result, avoid unless intentionally creating a high-key effect
- Rim light intensity: Set lower than the key to avoid lens flare; aim for a thin, clean edge highlight
- Dimmers and flags: Use these to fine-tune each light without repositioning the entire setup
Dark-colored vehicles require more fill light than light-colored ones because their surfaces absorb more light and shadows disappear into the paint. Metallic finishes respond differently than matte wraps, and chrome trim can create unwanted hot spots if the rim light is too strong. The practical approach is to meter each light individually, set the key first, then dial in the fill and rim relative to it.
Common challenges and expert tips for three-point lighting
Even with a correct three-point setup, automotive images can fail because of environmental factors that the lighting ratios alone cannot fix.
- Environmental reflections: Studio walls, light stands, and camera gear all reflect in car paint. Move equipment as far from the vehicle as practical and use black flags to block stray reflections.
- Fragmented highlights: Multiple small reflections on a single panel look unintentional. Use large soft light sources or broad bounce panels to create one smooth, continuous highlight.
- Glass and windshield clutter: Windshields and side glass pick up ceiling lights and background elements. Tenting the vehicle with white or black material controls what the glass reflects.
- Rim light flare: A rim light positioned too close or too bright will cause lens flare. Flag the rim light so it illuminates the car’s edge without spilling toward the lens.
- Setup complexity: Three-point lighting can be simplified by using one key light with a reflector-based fill and a single rim light, which works well in smaller spaces with limited equipment.
Pro Tip: Start by establishing the largest, smoothest highlight on the car’s most prominent panel using your key light alone. Once that reflection looks clean and intentional, add the fill and rim lights one at a time, checking how each addition affects the overall reflection pattern before locking in your settings.
Negative fill is a technique worth learning early. Placing a large black card or flag on the shadow side of the vehicle deepens the shadow without adding a competing light source. This is particularly effective on silver and white vehicles where the fill light can easily wash out the panel separation.
Three-point lighting vs. alternative automotive lighting methods
Not every automotive shoot calls for a full three-point studio setup. Understanding where this technique excels and where alternatives serve better helps you make the right choice for each project.
| Lighting method | Strengths | Limitations | Best use case |
|---|---|---|---|
| Three-point studio lighting | Full control over reflections, depth, and separation | Requires studio space and multiple fixtures | Commercial, dealership, editorial studio work |
| Natural light with reflectors | Organic feel, minimal equipment | Weather-dependent, limited reflection control | Lifestyle and outdoor automotive shoots |
| Single key light | Simple setup, fast execution | Flat without fill or rim, limited depth | Quick product shots or social media content |
| Light painting | Creative, highly customizable | Time-intensive, requires long exposures | Artistic and collector vehicle photography |
Three-point lighting is the preferred method for controlled studio environments because it gives the photographer authority over every tonal zone on the vehicle. Natural light with reflectors works well for lifestyle automotive photography where an organic, location-based feel is the goal. Light painting produces striking results for collector and exotic vehicles but demands significantly more time per image. The three-point approach remains the standard for commercial and editorial automotive shoots because it is repeatable, scalable, and produces consistent results across an entire vehicle lineup.
Key takeaways
Three-point lighting in automotive photography requires a key light to define reflections, a fill light to control shadow depth, and a rim light to create edge separation, with each element calibrated to the vehicle’s surface and the desired contrast ratio.
| Point | Details |
|---|---|
| Three lights, three functions | Key defines shape, fill softens shadows, rim separates the car from the background. |
| Fill intensity matters | Set fill at roughly 50% of key output; matching them flattens the image on reflective surfaces. |
| Reflections are the real subject | On glossy paint and chrome, controlling what reflects is more important than exposure settings. |
| Start with the key light | Establish one clean highlight on the primary panel before adding fill or rim lights. |
| Flags and negative fill | Use black flags and negative fill to deepen shadows and eliminate environmental clutter from paint. |
What 35 years of lighting cars has actually taught me
Most photographers who struggle with three-point lighting are not making mistakes with their gear. They are making mistakes with their eyes. They set up the lights, check the histogram, and declare the exposure correct. What they miss is that the car’s paint is not telling them the same story the histogram is.
The first thing I learned shooting cars professionally is that reflections are the image. The light itself is invisible. What you see in the final photograph is what the car’s surface chose to reflect, and your job is to curate that. A key light placed 6 inches in the wrong direction can turn a clean, sweeping highlight into a broken, fragmented mess across a door panel.
The second lesson took longer to absorb: less is almost always more. Beginners add lights to solve problems. Experienced photographers remove reflections. A black flag placed correctly does more for a car image than a third softbox. Negative fill and bounce boards can replace physical lights entirely in the right setup, which simplifies the workflow and reduces the number of competing reflections to manage.
My honest advice is to master the key light alone before you touch the fill or rim. Spend a full session placing only the key light and studying what it does to each panel at different heights and angles. Once you can predict where a highlight will fall before you fire the shutter, the fill and rim lights become easy decisions rather than guesswork.
— Ray
Elevate your automotive images with Baldinoautomotive
Baldinoautomotive specializes in controlled studio lighting for luxury, exotic, and performance vehicles, with over 35 years of professional experience behind every session. Ray Baldino’s work has appeared on more than 550 magazine covers, and the studio holds certification from the Professional Photographers of America.
Whether you are a dealership looking for consistent, high-quality vehicle images or a collector seeking editorial-grade photography, Baldinoautomotive delivers results grounded in technical discipline. Explore the full breakdown of how automotive photography works to deepen your understanding of studio lighting methods, or contact the studio directly to hire a professional automotive photographer for your next project.
FAQ
What are the three lights in automotive three-point lighting?
The three lights are the key light, fill light, and rim light. The key defines the primary illumination and reflections, the fill softens shadow depth, and the rim outlines the car’s edges to separate it from the background.
What key-to-fill ratio works best for car photography?
A 2:1 key-to-fill ratio produces natural, dimensional results for most automotive work. A 3:1 ratio creates more dramatic contrast suited to editorial and performance vehicle shoots.
Why does the rim light matter so much in car photography?
Without a rim light, dark-colored vehicles visually merge with the studio background, losing their profile and edge definition. The rim light creates a thin highlight along the car’s rear edges that communicates its full shape to the viewer.
How do you control unwanted reflections on car paint?
Use black flags, negative fill panels, and tenting to block environmental clutter from reflecting in the paint and glass. Moving light stands and gear farther from the vehicle also reduces the number of competing reflections on the car’s surface.
Can you shoot three-point automotive lighting with minimal equipment?
A single key light combined with a reflector-based fill and one rim light replicates the full three-point function without requiring multiple powered fixtures, making the setup practical for smaller studios and hobbyists working with limited gear.

