
Build an Automotive Photography Portfolio That Gets Noticed
June 21, 2026
An automotive photography portfolio is a curated collection of car images that demonstrates your technical skill, creative vision, and ability to deliver professional results. To build an automotive photography portfolio that attracts clients, you need more than a camera and a nice car. You need deliberate planning, disciplined execution, and a clear understanding of what separates a record shot from a compelling image. This guide covers the gear, shot frameworks, techniques, and curation strategies that portfolio building demands, drawing on the same principles Ray Baldino of Baldinoautomotive has applied across more than 550 magazine covers.
What gear and software do you need to build an automotive photography portfolio?
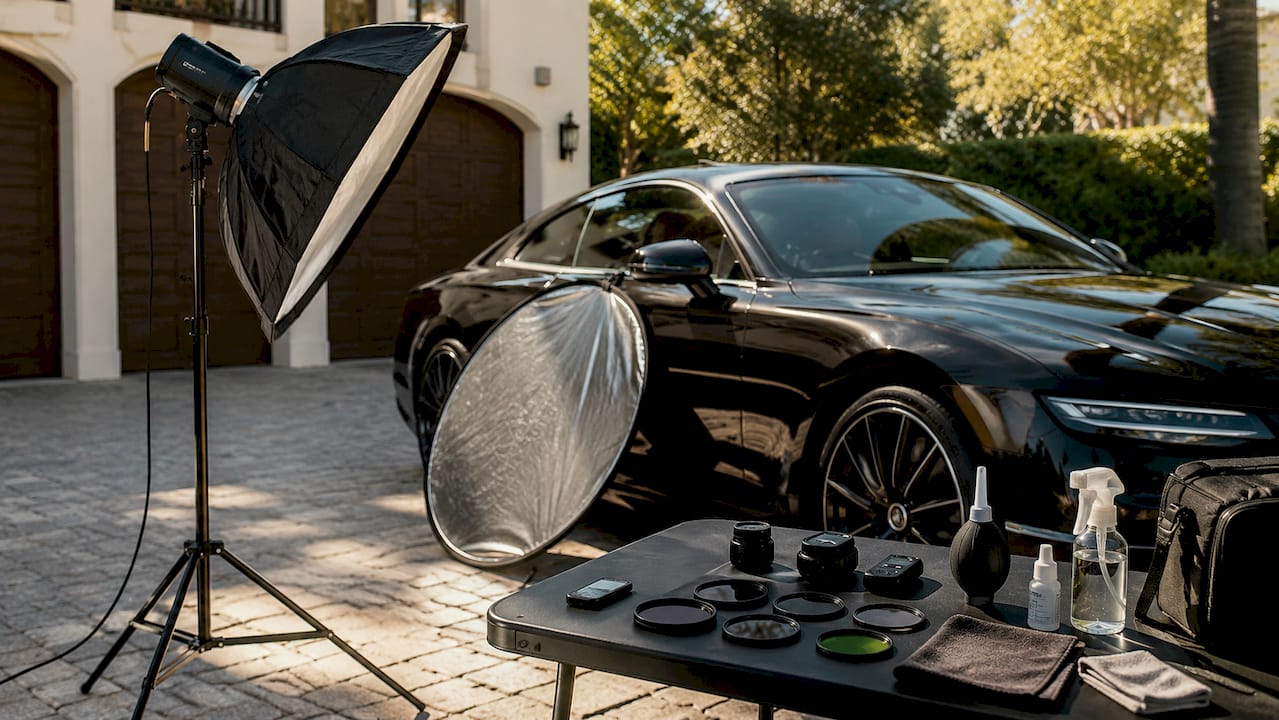
The right tools do not guarantee great images, but the wrong ones will limit you before you even start. Mirrorless cameras from Sony, Canon, and Nikon dominate professional automotive work because of their fast autofocus, high dynamic range, and compact bodies that handle low-angle shots well. Pair your body with a wide-aperture zoom or prime lens. Wide aperture settings in the f/2.8 to f/4 range and focal lengths between 50mm and 85mm deliver the sharpest detail shots and the most flattering perspective on body lines.
Lighting equipment matters as much as the camera. A set of collapsible reflectors, a portable LED panel, and a circular polarizing filter are the three items most beginners skip and most professionals never leave home without. The polarizer alone eliminates unwanted sky reflections from paint and glass, which is the single most common flaw in amateur car photos.
For editing and organizing, AI-assisted post-processing tools like Topaz Labs and Adobe Firefly have changed the workflow. Adobe Lightroom remains the standard for color grading and catalog management. Topaz Labs handles noise reduction and sharpening with speed that manual masking cannot match. Adobe Firefly adds generative fill for background cleanup, which is useful when a location has unavoidable distractions.
| Tool | Category | Strength | Limitation |
|---|---|---|---|
| Sony A7 IV / Canon R6 Mark II | Camera body | Fast AF, high dynamic range | Higher upfront cost |
| 50mm–85mm prime lens | Optics | Sharp detail, flattering perspective | Less flexible framing |
| Circular polarizing filter | Filtration | Kills paint reflections | Requires bright conditions |
| Adobe Lightroom | Editing / catalog | Industry-standard color grading | Subscription cost |
| Topaz Labs | AI editing | Fast noise reduction and sharpening | Best for post, not capture |
| Adobe Firefly | Generative editing | Background cleanup | Requires creative judgment |
Pro Tip: Bring a microfiber cloth, a detailing spray, and painter’s tape to every shoot. Car prep is a creative decision, not a chore. Dust, fingerprints, and panel gaps show up in every detail shot.
How do you plan a car photography shoot for your portfolio?
Shoot planning is where most beginners lose time and miss shots. Building your shoot day backward from your final deliverables is the most reliable method. Decide what the finished images need to accomplish before you arrive on location. A set of hero shots for a dealership requires different sequencing than a personal editorial project.
A well-planned shot list keeps you on track when conditions change. The standard framework covers 10 planned images and takes 60 to 90 minutes to execute properly. That structure looks like this:
- Two wide establishing shots showing the car in its environment from the front three-quarter and rear three-quarter positions.
- Three medium hero shots at eye level or slightly below, focusing on the most dramatic body lines.
- Three detail close-ups targeting the grille, wheels, badge, or any design feature unique to that model.
- One interior shot capturing the dashboard, steering wheel, or seat material with controlled ambient or artificial light.
- One motion shot using a panning technique to convey speed and energy.
Location scouting is not optional. The background, surface texture, and available light at your chosen spot will define the mood of every image. Scout your location at the same time of day you plan to shoot. Golden hour, roughly 30 to 60 minutes after sunrise or before sunset, gives you warm directional light that wraps around body panels without harsh shadows.
Pro Tip: Confirm your shot list with the car owner or dealer contact before shoot day. Locking down specific outputs prevents scope creep and protects your time.
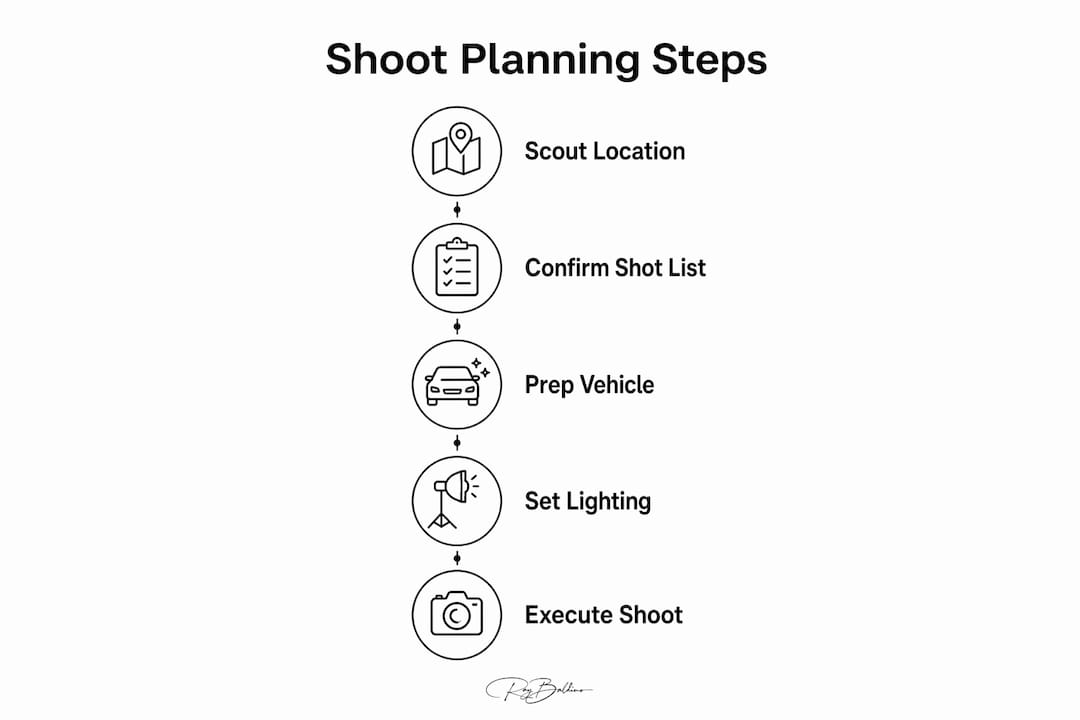
Coordinating with car owners requires professionalism from the first message. Arrive with the car already clean, or arrange for a detail beforehand. Car placement and floor protection are integral creative decisions that affect the final image, not logistics to handle after you arrive.
What photographic techniques and angles build a strong portfolio?
Modern automotive photography has moved away from static, formula-driven shots toward deliberate control of light and reflection. The classic three-quarter front shot still belongs in every portfolio, but it no longer differentiates you. The angles that get attention in 2026 are the ones that show your understanding of the car as a three-dimensional object with surfaces that react to light.
The essential angles to master are:
- Low front three-quarter: Position the camera at wheel height or below. This angle makes any car look more aggressive and fills the frame with the vehicle rather than the background.
- Silhouette shot: Place the car between the camera and a bright sky or setting sun. Expose for the background and let the car go dark. This works best with cars that have strong, recognizable profiles.
- Wheel close-up: Shoot at tire level with a wide aperture. Low angles and selective focus make wheel and brake detail shots look editorial rather than documentary.
- Cabin shot: Use a wide lens from the driver’s door opening. Bracket your exposures to manage the contrast between the bright exterior and the darker interior.
- Panning shot: Follow the car with your camera as it moves past you. Practicing panning shots until you can confidently shoot at 1/60s shutter speed is a recognized proficiency benchmark. At that speed, the car stays sharp while the background blurs into motion streaks.
Treating a car like a product on a shelf produces flat, lifeless images. Location and lighting design are what separate a technically correct exposure from a compelling photograph. Even an image with minor exposure flaws can succeed if the environment and light are managed well. The reverse is never true. A perfectly exposed shot in a bad location with flat light will never be portfolio-worthy.
Pro Tip: Study the three-point lighting setup for interior and detail work. It gives you control over shadows and depth that natural light alone cannot provide.
For outdoor work, a circular polarizer on your lens controls reflections on paint and glass. For studio or garage work, large diffusion panels and reflectors shape the light across body panels. The goal in both cases is the same: control what the paint surface reflects.
How do you organize and curate your automotive photography portfolio?
A portfolio is a brand-building tool, not a random collection of your favorite images. Every photo you include sends a signal about your style, your technical range, and the type of work you want to attract. Curate with that filter in mind.
Quality over quantity is the rule that most beginners resist and most professionals enforce. Fifteen strong images outperform forty average ones every time. A potential client or dealership will form a judgment within the first few seconds of viewing your work. If the first image does not hold attention, the rest will not matter.
Organize your portfolio by vehicle type, brand, or shoot style rather than by date. Successful photographers group their work around automotive personalities, such as luxury sedans, performance coupes, or off-road trucks, because it shows the client you understand the visual language of their specific market. A dealership selling exotic sports cars wants to see that you can handle reflective paint and dramatic angles, not that you once photographed a minivan.
- Start with personal projects. Beginning on personal projects lets you refine your style and build a cohesive body of work before pursuing commercial or editorial clients. Reach out to local car clubs, collectors, or enthusiast groups. Most owners are glad to have professional images of their vehicles.
- Maintain a consistent editing style. Your color grading, contrast choices, and retouching approach should feel unified across the portfolio. Inconsistency reads as inexperience.
- Use a dedicated platform. Squarespace, Format, and Adobe Portfolio all support full-width image display, which automotive photography requires. Social platforms like Instagram work for visibility but not for formal presentation.
- Build a personal automotive photography archive. Keep every shoot organized in Adobe Lightroom with consistent folder naming and keyword tagging. Your archive is your reference library and your backup.
Pro Tip: When you approach a dealership with your portfolio, bring a printed version as well as a digital link. Print quality demonstrates your commitment to the craft in a way a phone screen cannot.
Key takeaways
A strong automotive photography portfolio requires deliberate shot planning, disciplined technique, and consistent curation to demonstrate both style and technical range.
| Point | Details |
|---|---|
| Plan before you shoot | Use the 10-shot framework covering wide, hero, detail, interior, and motion images. |
| Control light and reflection | Managing reflections is the single biggest factor separating record shots from compelling images. |
| Master essential angles | Low three-quarter, silhouette, wheel close-up, cabin, and panning shots define a complete portfolio. |
| Curate by quality, not quantity | Fifteen strong images outperform forty average ones when presenting to clients or dealerships. |
| Start with personal projects | Build your style on personal shoots before approaching commercial clients or editorial outlets. |
What 35 years taught me about building a portfolio that actually works
Most aspiring automotive photographers make the same mistake. They shoot everything they can access and call it a portfolio. The result is a collection that shows effort but not vision. A portfolio is not a record of what you have photographed. It is an argument for why someone should hire you.
The photographers I have seen grow fastest are the ones who treat every personal shoot as a commercial assignment. They write a shot list. They scout the location. They prep the car. They edit with intention. That discipline, applied consistently on unpaid work, is what produces images worth showing to paying clients.
The other thing I would tell any beginner is this: do not wait for the perfect car. I have seen extraordinary portfolios built around ordinary vehicles because the photographer understood light and composition. I have also seen forgettable portfolios built around Ferraris and Lamborghinis because the photographer pointed and clicked. The car is the subject. You are the author.
Developing a distinctive style takes time, but it starts with mastering the fundamentals. Learn your angles. Learn your light. Learn how paint surfaces behave at different times of day. Once those decisions are automatic, your personal vision has room to emerge. That is when a portfolio stops looking like practice and starts looking like a body of work.
— Ray
How Baldinoautomotive can help you go further
Baldinoautomotive has spent over 35 years developing the workflows, techniques, and client relationships that define professional automotive photography. The studio’s resources are built for photographers who want to move beyond trial and error and learn from a Master Photographer certified by the Professional Photographers of America.
If you are serious about developing your craft, the automotive photography workflow guide on the Baldinoautomotive site covers professional shoot execution in depth. For photographers ready to understand what commercial clients actually expect, the commercial photography standards page breaks down the requirements dealerships and brands use to evaluate work. Both resources are free and written from direct professional experience.
FAQ
What is an automotive photography portfolio?
An automotive photography portfolio is a curated set of car images that demonstrates a photographer’s technical skill, creative range, and ability to deliver professional results. It serves as the primary tool for attracting commercial clients, dealerships, and editorial outlets.
How many photos should an automotive portfolio include?
Quality matters more than volume. Fifteen to twenty strong images organized by vehicle type or shoot style present a more professional impression than a large collection of inconsistent work.
What shots are required in a car photography portfolio?
A complete portfolio covers wide establishing shots, medium hero shots, detail close-ups, interior images, and at least one motion shot. The standard shot list covers 10 planned images and takes 60 to 90 minutes to execute properly.
What camera settings work best for automotive detail shots?
Shoot detail shots at f/2.8 to f/4 with focal lengths between 50mm and 85mm. Low angles combined with selective focus make wheel and badge shots look editorial rather than documentary.
How do you get cars to photograph for your portfolio?
Start with personal projects by contacting local car clubs, collectors, and enthusiast groups. Most owners welcome professional images of their vehicles, which gives you access to a range of makes and models without commercial pressure.
Recommended
- How Automotive Photography Works Explained for Photographers
- Automotive Commercial Photography: What Businesses Need to Know

