
Exotic Car Photography Lighting Techniques That Work
June 20, 2026
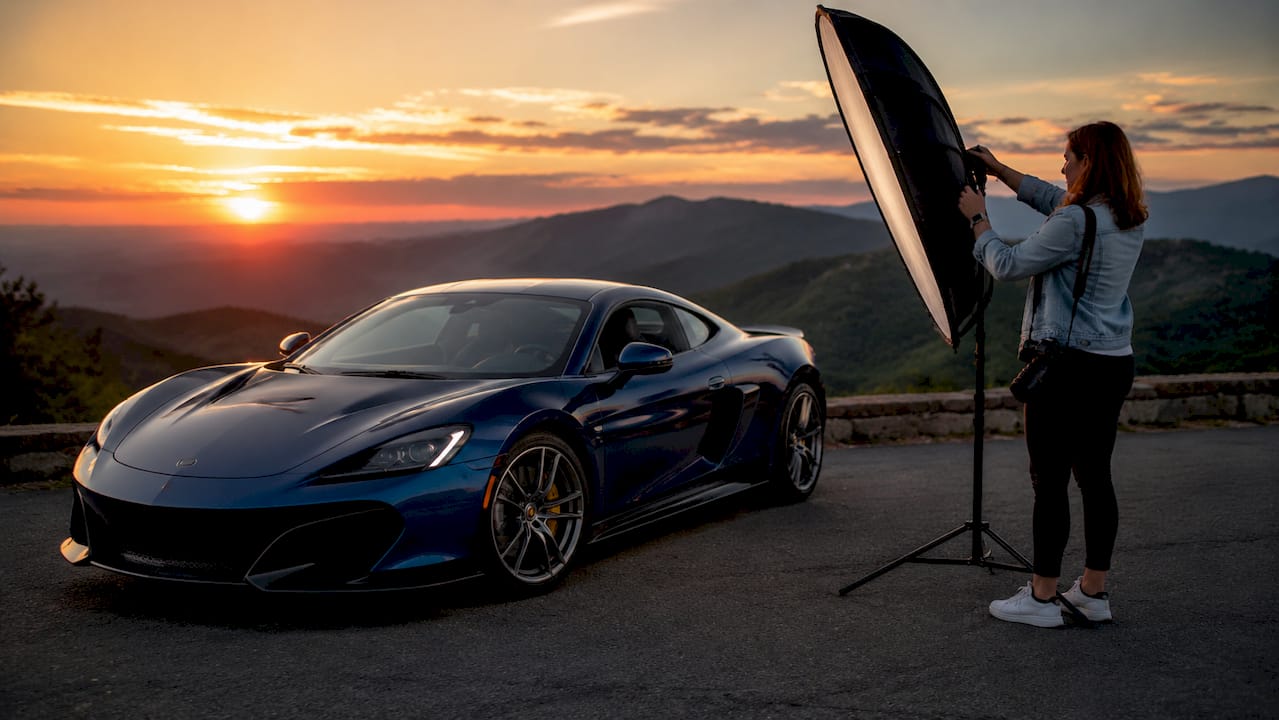
Exotic car photography lighting techniques are the single greatest factor separating a forgettable snapshot from a magazine-worthy image. Light controls how a Lamborghini’s shoulder line reads, how a Ferrari’s paint depth registers, and whether a Porsche’s curves look sculpted or flat. Both natural and artificial approaches play distinct roles, and the tools involved, from studio strobes and LED panels to polarizing filters and black flags, each affect the final result in specific ways. Baldinoautomotive, led by Master Photographer Ray Baldino with over 35 years of experience and more than 550 magazine covers, has built its reputation on exactly this discipline.
1. What are the best natural lighting conditions for exotic car photography?
Natural light is the most accessible tool in automotive photography, but only when used at the right moment. The quality of outdoor light changes dramatically within minutes, and knowing when to shoot determines whether you capture a car’s form or lose it entirely.
Golden hour is the most productive window for outdoor hero shots. The 30–45 minute window before sunset or after sunrise delivers warm, low-angle light that rakes across body panels and defines three-dimensional form. That directional quality is what separates a flat daytime shot from an image with genuine depth.
Overcast skies function as a natural giant softbox. Clouds diffuse sunlight evenly across the entire vehicle, eliminating harsh shadows and allowing true paint color to register accurately. This condition is ideal for technical detail shots where color accuracy matters more than dramatic shadow play.
Midday direct sun is the worst condition for exotic car photography. Overhead light blows out highlights on horizontal surfaces like hoods and roofs while casting deep, unusable shadows under wheel arches. These problems are difficult to correct in post-processing.
- Position the car so the sun falls behind or beside the photographer, not in front of the lens
- Use open shade from buildings or trees to block direct overhead light during midday
- Shoot with the car at a 45-degree angle to the light source to maximize body line definition
- Bracket exposures to retain highlight detail on reflective paint surfaces
- Check your histogram after every setup change, not just the camera preview screen
Pro Tip: Arrive at your outdoor location 20 minutes before golden hour begins. Use that time to test angles and finalize your composition so you are ready to shoot the moment the light quality peaks.
2. How to set up studio lighting for exotic car photography
Studio control is where professional automotive photography separates from enthusiast work. A controlled environment removes variables and lets you shape light with precision that outdoor conditions cannot match.
The standard studio lighting setup for exotic car photography uses 2–4 LED panels or strobes positioned at 45-degree angles, placed approximately 8–10 feet from the vehicle. This distance and angle creates even highlights along the car’s shoulder lines without producing glare. Budget setups using four LED panels at 500W equivalent each typically cost $800–$1,200, with optional softboxes adding $30–$50 per unit.
Here is a proven four-light studio setup sequence:
- Key light: Place the primary light at a 45-degree angle to the front quarter panel, about 8 feet out, to establish the main highlight gradient along the car’s body
- Fill light: Position a second light at the opposite 45-degree angle at reduced power to soften shadows without eliminating them
- Rim light: Add a third light behind and slightly above the car to separate the vehicle from the background and define the roofline
- Detail light: Use a fourth focused light for interior shots or specific surface details like badges, grilles, or wheel spokes
- Negative fill: Place black fabric or flags between lights and the car body to carve shadow separation and prevent the image from looking flat
Negative fill is as important as key lighting in professional studio setups. Without it, even well-placed lights produce a flat, undifferentiated surface that fails to communicate the car’s sculptural quality.
Color temperature consistency is non-negotiable. Mixing daylight with halogen or LED sources of different color temperatures causes color casts that degrade image quality and make inventory images look mismatched. Use a single light source type throughout the entire shoot.
Pro Tip: Shoot a gray card under your studio lights before the session begins. Use it to set a custom white balance in-camera. This eliminates color cast correction in post and keeps your images consistent across the full shoot.
| Setup type | Best for | Key limitation |
|---|---|---|
| 2-light strobe | Quick commercial shots | Limited shadow control |
| 4-light LED panel | Full studio detail work | Higher cost and setup time |
| Mixed strobe and LED | Creative editorial work | Color temperature management required |
| Single softbox | Budget or small studio | Flat light, minimal form definition |
3. What are the key tools for controlling reflections and highlights?
Reflections are the defining challenge of exotic car photography. Glossy paint, glass, and chrome all mirror their surroundings, and managing those reflections requires specific tools and deliberate technique.
Polarizing filters reduce glare on glass and metallic paint surfaces. However, over-reliance on polarizing filters can produce uneven reflections and distorted results. They work best as a complement to good lighting, not a substitute for it. Always verify results on a high-resolution display, not just the camera’s rear screen.
The size and distance of your light source directly determines reflection quality. Larger and more distant lights produce softer, more gradual highlight gradients. These elegant gradients are what give high-end automotive images their polished, magazine-quality appearance. Pointing a light too directly at a glossy surface fragments the highlight and creates an unattractive, broken reflection.
- Use large softboxes or strip lights to produce smooth, continuous highlight gradients on door panels
- Keep light sources at least 8 feet from the vehicle surface to soften the gradient edge
- Use handheld reflectors or bounce cards to fill dark areas like wheel wells and door sills
- Rotate a circular polarizer slowly while watching the live view to find the exact point of maximum glare reduction
- For glass surfaces, position lights so they reflect into the glass at an angle that avoids direct lens flare
Light painting is a technique that works particularly well for exotic cars in low-light or nighttime settings. Using an aperture around f/8 and
exposure times of 10–15 seconds, you move a continuous light source across the car’s surface during the exposure. The result is even, dramatic illumination without harsh shadows. This approach also gives you precise control over which surfaces receive light.
4. How to adapt lighting for different finishes and situations
Different paint finishes and shooting environments require different approaches. A technique that works perfectly on a gloss red Ferrari will fail on a matte black Lamborghini or a pearlescent white McLaren.
Matte finishes absorb light rather than reflect it. They require softer, more diffused sources to reveal their texture without creating unwanted sheen. Avoid direct flash or hard strobes on matte paint. Overcast natural light or large softboxes at low power work best.
Metallic and pearlescent finishes shift color depending on the angle of the light. Shoot these finishes from multiple angles to capture their full range. Use a single consistent light source so the color shift reads as intentional, not as a color cast.
- For night shoots, use continuous LED panels rather than strobes so you can see the light effect in real time
- In mixed indoor and outdoor environments, block all ambient light and rely entirely on your artificial sources
- When shooting in variable weather, use a portable reflector as a fill source rather than adding a second flash unit
- For interior shots, use a small, focused LED panel aimed at specific trim details rather than flooding the cabin with general light
- Avoid mixing color temperatures during a shoot by committing to either daylight or studio sources exclusively
| Finish type | Recommended light source | Key technique |
|---|---|---|
| Gloss paint | Large softbox or overcast sky | Smooth gradient, negative fill |
| Matte paint | Diffused LED or overcast sky | Low power, wide spread |
| Metallic paint | Single consistent source | Multiple angles, no mixed temps |
| Pearlescent paint | Directional side light | Capture color shift intentionally |
| Chrome or glass | Polarizer plus controlled reflection | Avoid direct light into lens |
High-end dealership photography demands absolute lighting consistency across every image in a set. Fluctuating exposures or mixed light types produce inventory images with mismatched color casts that reduce buyer confidence. Consistency is not optional at the professional level.
Pro photographers approach complex vehicles by tackling surfaces separately: shaping the bodywork first, then controlling glass reflections with negative fill, and finally lighting deep interior trims with focused lights. This layered approach produces three-dimensionality that a single-pass lighting setup cannot achieve.
Pro Tip: When shooting forged or polished wheels, position a strip light parallel to the wheel face to create a single, clean highlight across the spokes. A direct light aimed at the wheel center creates multiple competing reflections that look chaotic in the final image. For more on wheel finish photography, the surface preparation matters as much as the light.
Key takeaways
Mastering exotic car photography lighting requires controlling shadow separation, light source size, color temperature, and surface-specific technique across every setup.
| Point | Details |
|---|---|
| Golden hour is the top outdoor window | Shoot 30–45 minutes before sunset for warm, directional light that defines body lines. |
| Studio setups need 2–4 lights | Position LED panels or strobes at 45-degree angles, 8–10 feet from the vehicle. |
| Negative fill is non-negotiable | Use black flags to carve shadow separation and prevent flat, undifferentiated surfaces. |
| Match your light to the finish | Matte, metallic, and gloss finishes each require different source types and distances. |
| Color temperature consistency protects image quality | Never mix daylight and artificial sources in the same shoot. |
What 35 years behind the lens taught me about lighting exotic cars
Most photographers chase brightness. The real work is in the shadows.
After shooting for over three decades and appearing on more than 550 magazine covers, the lesson that took longest to fully absorb is this: shadow-based form reading defines a car’s visual impact more than any amount of added light. A well-placed shadow tells the viewer where a fender curves, where a door panel transitions, and where the roofline meets the glass. Brightness alone flattens all of that.
Beginners consistently make the same mistake. They add more light when an image looks wrong. The correct move is almost always to subtract light or add negative fill. A black flag placed correctly does more for a car’s form than a second strobe ever will.
Patience with natural light also outperforms any quick fix. I have waited two hours at a location for the light to shift three degrees. That patience produced images that no studio setup could replicate. The discipline to wait is a skill, and it is one that separates photographers who understand light from those who simply use it.
My advice for photographers building their lighting practice: invest in incremental improvements to your existing setup before buying new gear. A better understanding of light distance and source size will improve your images more than doubling your equipment budget. Experiment with moving your key light six inches closer or further and study the change in the highlight gradient. That kind of deliberate practice builds the visual vocabulary that makes lighting decisions instinctive.
— Ray Baldino
Take your exotic car photography further with Baldinoautomotive
Lighting knowledge is the foundation, but applying it consistently across studio sessions, on-location shoots, and commercial presentations requires experience that goes beyond technique.
Baldinoautomotive offers specialized automotive photography services for dealerships, private collectors, and commercial clients who need images that perform. Ray Baldino’s PPA-certified approach covers everything from controlled studio lighting setups to demanding on-location exotic car sessions. If you want to understand the full scope of what professional automotive photography involves, the automotive photography guide at Baldinoautomotive covers the process in detail. For dealerships ready to commission work, hire a specialist who has built a career on getting this right.
FAQ
What is the best time of day for outdoor exotic car photography?
The 30–45 minute window before sunset or after sunrise, called golden hour, delivers the warmest and most directional natural light for automotive photography. Overcast conditions are the second-best option for technical detail and color accuracy work.
How many lights do I need for a studio car shoot?
A professional studio setup uses 2–4 lights. Two lights cover basic commercial work, while four lights allow full control over highlights, shadows, rim separation, and detail areas like interiors and wheels.
Do polarizing filters eliminate reflections on car paint?
Polarizing filters reduce glare on glass and metallic paint but do not eliminate reflections entirely. Over-reliance on them can create uneven or distorted results, so they work best alongside proper light placement rather than as a standalone fix.
How do I photograph matte paint finishes correctly?
Matte paint requires diffused, soft light sources such as large softboxes or overcast natural light. Direct flash or hard strobes create unwanted sheen on matte surfaces and should be avoided entirely.
What is light painting in exotic car photography?
Light painting is a long-exposure technique where you move a continuous light source across the car’s surface during a 10–15 second exposure at around f/8. It produces even, dramatic illumination with precise surface control and no harsh shadows.
Recommended
- How Automotive Photography Works Explained for Photographers
- Three-Point Lighting for Automotive Photography Explained

