
Common Automotive Photography Mistakes to Stop Making
June 19, 2026
Common automotive photography mistakes are the single biggest reason a well-maintained vehicle looks mediocre in photos. Whether you shoot a Ferrari on a Florida coast or a used luxury sedan for a private listing, the same errors appear repeatedly: wrong camera angle, poor lighting timing, unclean surfaces, cluttered backgrounds, and technical missteps in post-processing. These are not beginner problems exclusive to smartphone shooters. Professionals at every level fall into these traps. This article names each mistake directly and gives you the correction, so your next shoot produces images that accurately represent the vehicle and hold a viewer’s attention.
1. What are the most common angle and composition errors in automotive photography?
Standing eye-level shooting is the most common angle mistake in automotive photography. When you shoot from your natural standing height, you flatten the vehicle’s profile, compress the hood, and make the car look smaller than it is. The correction is straightforward: drop your camera to door handle level or below.
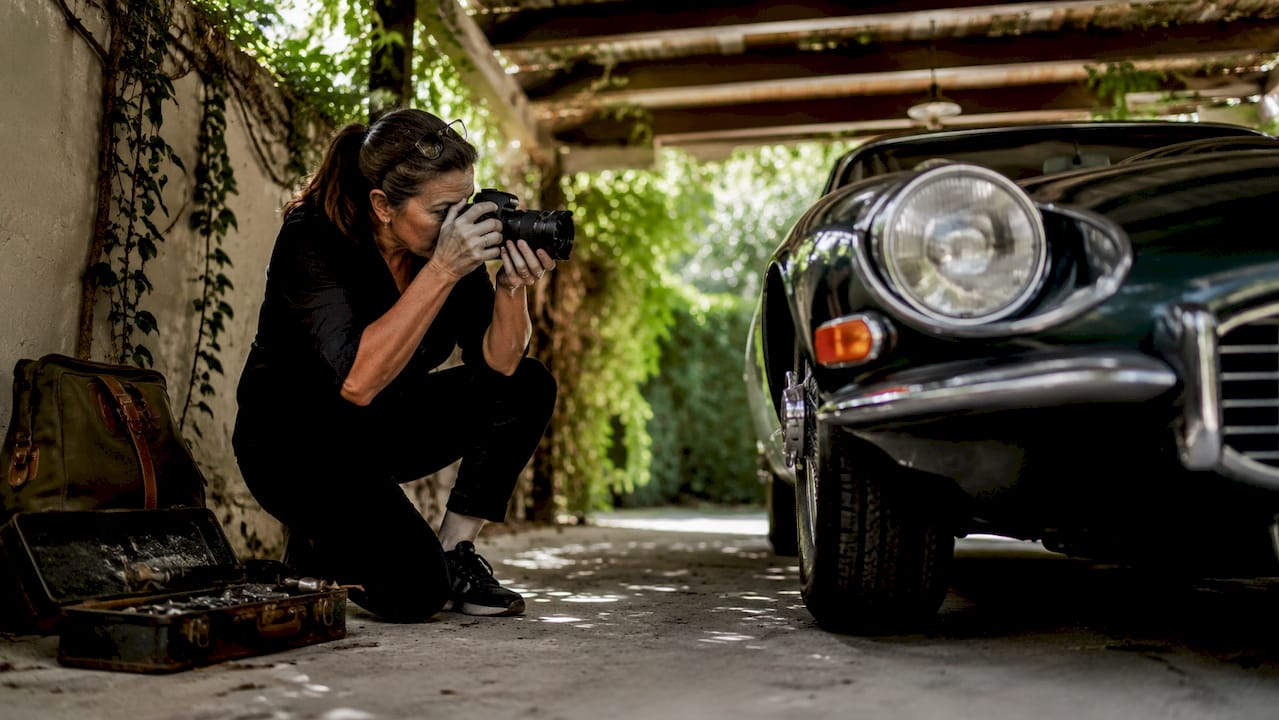
Distance matters just as much as height. Shooting at least 3 meters back reduces the distortion that wide-angle lenses create when you stand too close. That distortion stretches the front end and shrinks the rear, making the vehicle look unbalanced.
Orientation is another frequent error. Landscape orientation is the standard for automotive photos. Portrait orientation forces awkward cropping and produces black bars on most listing platforms and social media feeds. Every shot of the exterior should be horizontal.
- Shoot at or below door handle level to elongate the hood and emphasize the vehicle’s stance
- Stand at least 3 meters from the vehicle to reduce wide-angle lens distortion
- Always use landscape orientation for exterior shots
- Shoot at a 45-degree angle to the front or rear quarter panel for the most flattering perspective
Pro Tip: Walk around the car and crouch at different points before you take a single shot. The angle that makes the vehicle look longest and lowest is almost always the right one.
2. How does lighting affect automotive photos and what are common lighting mistakes?
Shooting in harsh midday sun is the most damaging common lighting error in car photography. Direct overhead sun creates blown highlights on the roof and hood while casting deep shadows under the doors and bumpers. The result is a photo that looks overexposed in some areas and underexposed in others simultaneously.
The preferred conditions are open shade or overcast skies. Overcast days provide the easiest, most consistent light for automotive work because the cloud cover acts as a giant diffuser. Shadows soften, highlights stay controlled, and the vehicle’s paint color renders accurately.
Golden hour, the 30–45 minutes after sunrise or before sunset, adds warmth and directional light that sculpts body lines beautifully. Using 30–45 degree grazing light angles across body panels enhances the vehicle’s form in ways that flat midday light cannot.
Indoor fluorescent and mixed artificial lighting create color casts that are difficult to correct in post-processing. A white car under fluorescent light turns green. A red car under sodium vapor lighting turns orange. Avoid indoor shooting unless you have full control over the light source.
- Avoid shooting between 10 a.m. and 3 p.m. in direct sun
- Prioritize overcast days or open shade for consistent, shadow-free results
- Use golden hour light to add depth and warmth to body lines
- Avoid mixed artificial lighting indoors unless using controlled studio strobes
Pro Tip: Position the vehicle so the light source is at a 30–45 degree angle to the side of the car rather than directly behind or in front of you. That angle reveals every curve and crease in the bodywork.
For a deeper look at how to structure your light sources, Baldinoautomotive’s guide on three-point lighting covers the full technique with practical setup details.
3. Why is vehicle and equipment preparation critical?
Not cleaning the vehicle inside and out before a shoot is one of the most avoidable mistakes in car photography. Dirt, water spots, and dust on the paint surface show up clearly in photos, especially on dark-colored vehicles. A thorough wash and dry session before the shoot takes 30–45 minutes and directly protects the perceived value of the vehicle.
Here is a preparation checklist that covers the details most photographers skip:
- Wash and dry the full exterior, including wheels and wheel wells
- Clean all glass surfaces inside and out to eliminate haze and smudging
- Vacuum the interior and remove all personal items from seats, dashboards, and door pockets
- Apply a matte tire dressing and wipe off any runoff from the sidewall to the pavement
- Clean the camera lens before the shoot. Lens cleaning takes less than 5 seconds and prevents the soft, hazy images that a smudged front element produces
The interior is frequently overlooked in used luxury car photos. A coffee cup on the center console or a gym bag on the rear seat tells the viewer the car is lived-in carelessly. That impression costs you credibility whether you are selling or showcasing.
4. What background and setting mistakes should automotive photographers avoid?
Car paint is a mirror. Professionals scout locations specifically to control what reflects in the vehicle’s surface. A parked car in a busy lot reflects shopping carts, other vehicles, and passersby. Those reflections appear in the paint and glass, pulling the viewer’s eye away from the vehicle itself.
The most damaging reflection mistake is capturing yourself or your camera in the paint. Shooting at an acute angle to the panel rather than directly perpendicular at 90 degrees eliminates this problem. Professional automotive photographers shoot at acute angles to panels to avoid reflecting themselves while still capturing the vehicle’s lines.
Cluttered backgrounds reduce the professionalism of any automotive photo. A chain-link fence, a dumpster, or a row of utility poles behind the vehicle competes with it visually. When a dedicated photo area is unavailable, scouting locations and using AI background replacement tools can address the problem in post-processing.
- Scout your location before the shoot, not during it
- Choose backgrounds that are neutral, clean, and contextually appropriate for the vehicle type
- Use open shade to soften reflections in the paint
- Shoot at an angle to avoid capturing yourself in the vehicle’s surface
Pro Tip: A concrete parking structure with a clean wall, an empty industrial lot, or a wide open field all work well. The background should support the vehicle, not compete with it.
5. What technical mistakes often degrade automotive photos?
The table below compares the most common technical errors against the correct approach:
| Mistake | Correct Practice |
|---|---|
| Shooting with a wide-open aperture (f/1.8) | Use f/7.1–f/11 to keep the full vehicle in focus |
| Using a slow shutter speed handheld | Use a tripod or shoot at 1/200s or faster |
| Over-saturating colors in post-processing | Correct exposure and white balance only; preserve true color |
| Removing dents or scratches in editing | Show the vehicle accurately; authentic photos build buyer trust |
| Shooting only a few frames | Take 50–100 frames per session and select the best |
Attempting to hide imperfections through editing reduces buyer confidence more than the imperfection itself does. Modern buyers use photo assessment tools and cross-reference listing images carefully. A digitally removed scratch discovered in person damages the sale more than the scratch would have.
Over-editing by over-saturating colors or altering true vehicle condition is a specific form of misrepresentation. Appropriate post-processing covers exposure correction, white balance adjustment, straightening, and cropping. Nothing more is needed for an honest, professional result.
Not taking enough photos is also a technical mistake. Experienced automotive photographers shoot dozens of frames per angle and select the sharpest, best-composed image from each sequence. Showing up with five photos of a vehicle tells buyers you did not invest the time.
Key takeaways
Avoiding common automotive photography mistakes requires disciplined preparation, correct camera positioning, and honest post-processing above all else.
| Point | Details |
|---|---|
| Camera angle determines everything | Shoot at or below door handle level and at least 3 meters back to avoid distortion. |
| Light quality beats camera quality | Overcast skies and golden hour light outperform any camera setting in direct midday sun. |
| Preparation is non-negotiable | Wash the car, clean the lens, and remove personal items before taking a single frame. |
| Reflections require active management | Scout locations and shoot at acute angles to panels to control what appears in the paint. |
| Authenticity protects credibility | Accurate, unaltered photos build buyer trust and outperform edited misrepresentations in listings. |
What 35 years behind the lens taught me about these mistakes
I have been photographing vehicles professionally for over 35 years, and the mistakes I see most often are not technical. They are attitudinal. Photographers show up without scouting the location, without washing the car, and without thinking about where the light is coming from. Then they spend an hour in post-processing trying to fix problems that 20 minutes of preparation would have prevented.
The insight that changed how I approach every shoot is this: light and location matter more than camera gear. A smartphone in the right location at the right time of day will outperform a $10,000 camera body in a parking lot at noon. That is not an opinion. That is physics.
Authenticity is the highest-value asset in any vehicle photo. Authentic, unaltered photos perform better in listings because buyers trust what they see. The moment a buyer suspects a photo has been manipulated, the sale is harder to close. Show the vehicle honestly, in good light, from a flattering angle, and let the car speak for itself.
The photographers and car owners who improve fastest are the ones who scout before they shoot, prepare the vehicle before they touch the camera, and resist the urge to fix in post what should have been fixed on location. Practice those three habits and the technical skills follow naturally.
— Ray Baldino
How Baldinoautomotive helps you get it right
Baldinoautomotive has spent decades refining the exact techniques that separate professional automotive images from amateur ones. Ray Baldino, a Master Photographer certified by the Professional Photographers of America with work featured on over 550 magazine covers, brings that depth of experience to every resource and service the studio offers.
Whether you are a car owner preparing a listing, a dealership building a photo program, or a photographer developing your craft, Baldinoautomotive’s educational resources give you the foundation to avoid every mistake covered in this article. Start with the studio’s detailed breakdown of how automotive photography works to understand the principles behind every decision. For businesses that need professional results immediately, explore commercial automotive photography services tailored to luxury and performance vehicles.
FAQ
What is the most common angle mistake in car photography?
Shooting from standing eye level is the most frequent angle error. Camera position at door handle level or below, combined with at least 3 meters of distance, produces the most accurate and flattering vehicle proportions.
When is the best time of day to photograph a car?
Golden hour, the 30–45 minutes after sunrise or before sunset, provides the most flattering directional light. Overcast conditions are the second-best option because they eliminate harsh shadows and blown highlights entirely.
Does editing photos hurt automotive listings?
Yes. Over-editing or hiding vehicle flaws reduces buyer trust and damages sale outcomes. Accurate post-processing covers only exposure, white balance, and cropping.
How do I avoid reflections in car paint?
Scout your location before the shoot and position the vehicle away from people, other cars, and reflective structures. Shoot at an acute angle to each panel rather than directly perpendicular to avoid capturing yourself in the paint.
Does camera gear determine photo quality in automotive photography?
No. Professional photographers prioritize light and location over equipment. A well-positioned smartphone in open shade at golden hour produces better results than an expensive camera in poor conditions.
Recommended
- How Automotive Photography Works Explained for Photographers
- Automotive Commercial Photography: What Businesses Need to Know

