
How to Photograph Cars for Print Advertising
June 14, 2026
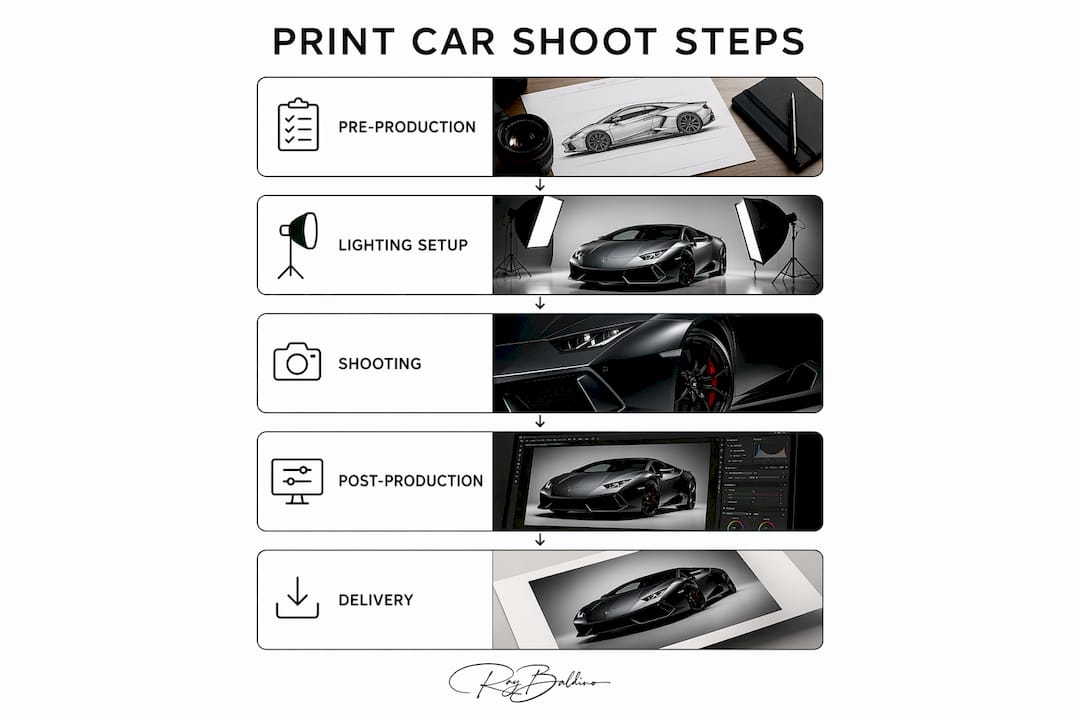
Photographing cars for print advertising is defined as the disciplined practice of controlling light, reflections, and vehicle presentation to produce images that meet the color accuracy and resolution demands of print media. Commercial automotive photography, the recognized industry term, requires far more than pointing a camera at a polished vehicle. Reflection management, production logistics, and post-production precision determine whether a final image holds up under the scrutiny of a full-page magazine spread or a large-format billboard. This guide covers the complete workflow, from pre-production planning through post-processing, with techniques used on campaigns for brands like General Motors and Range Rover.
What are the key production planning steps for a print shoot?
Production planning is the foundation of every successful commercial automotive shoot. The hard part of any campaign lies upstream: logistics, permissions, and reflection quality control are what separate repeatable, high-quality results from chaotic ones. Getting these elements locked before the shoot day protects your budget, your timeline, and your final image quality.
A General Motors multi-market campaign across Latin America illustrates this clearly. The production team managed vehicle movement, insurance and permit logistics, temporary street closures, and lighting windows simultaneously. Without that level of upstream control, the shoot would have produced inconsistent images across markets.
Here is what a disciplined pre-production checklist covers:
- Shot list and deliverables: Lock every required output before the shoot day. Hero shots, detail images, and composite plates each require different camera positions and lighting setups.
- Permits and insurance: Secure location permits and vehicle insurance early. Delays here push shoot dates and compress post-production timelines.
- Vehicle preparation: Confirm the vehicle arrives clean, detailed, and free of transport damage. Any surface flaw becomes a reflection problem.
- Lighting plan: Map out your light sources, modifiers, and reflector positions for each shot in advance. Improvising on set costs time and consistency.
- Scheduling: Identify your optimal lighting windows and build the day around them, not around convenience.
Pro Tip: Create a shot list that specifies camera angle, lens, and lighting setup for each deliverable. Share it with the entire crew before the shoot day. This single document eliminates most on-set confusion and keeps the vehicle handling to a minimum.
How do lighting and reflection control influence car photography for print?
Reflection control is the defining technical challenge when you photograph cars for print. Car surfaces are essentially mirrors. Every light source, every wall, and every person in the room shows up somewhere on the paint or glass. The professional approach treats reflection shaping as a design problem, not a camera settings problem.
The most effective technique is to shape your light sources and environment before you fire a single frame. Large, soft light sources like overhead diffusion panels or white cyc walls create gradual, controlled gradients across the body panels. These gradients read as depth and form in print. Hard, point-source lights create sharp, distracting reflections that require heavy retouching to remove.
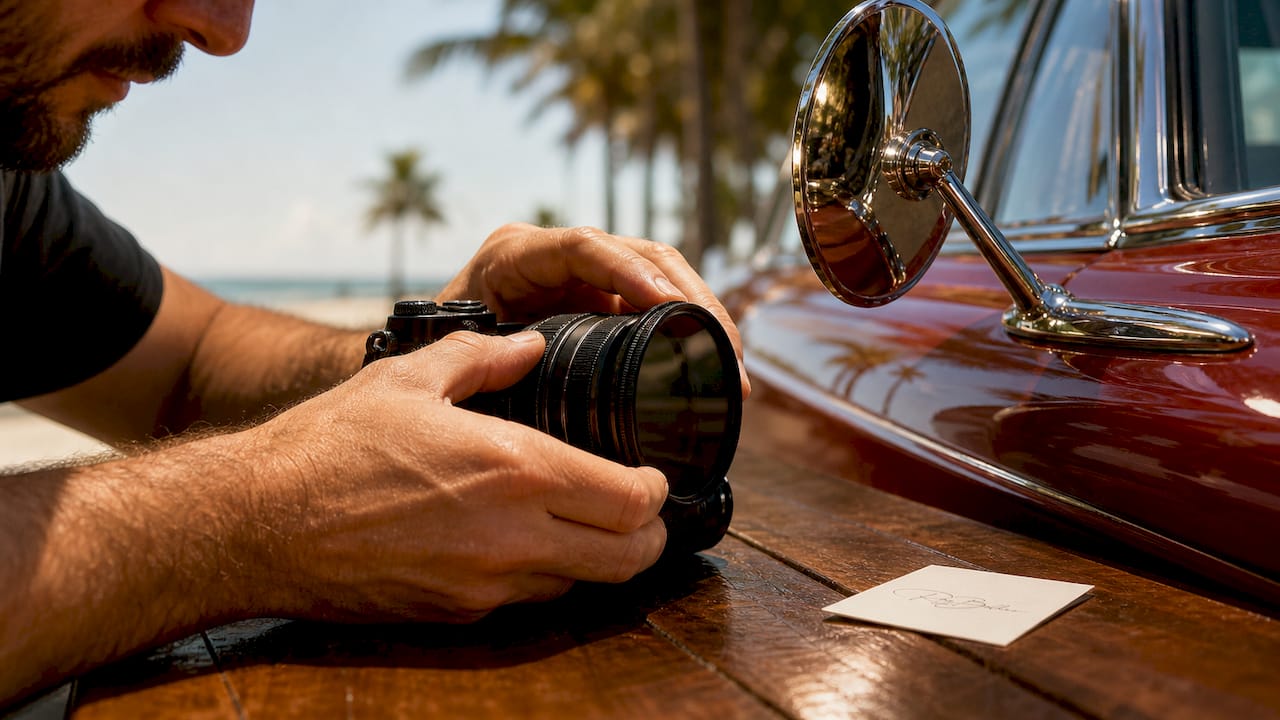
Circular polarizer filters, known as CPL filters, are the most practical tool for managing reflections on glass and paint in real time. CPL filters reduce unwanted reflections on car paint and glass while simultaneously improving color saturation. The effect is visible immediately through the viewfinder, which means you correct the problem before capture rather than in post-production.
Pro Tip: Rotate your CPL filter slowly while looking through the viewfinder at the most problematic reflection on the vehicle. Stop when the reflection reaches its minimum intensity. Lock the filter position before adjusting any other settings.
The environment itself contributes to reflection quality. Studio floors should be covered or treated to prevent unwanted color casts from bouncing up into the lower body panels. Outdoors, the ground surface, nearby buildings, and even clothing worn by crew members can appear in the paint. Controlling what surrounds the vehicle is as important as controlling the lights above it.
Which camera settings and equipment best suit car ads?
Equipment choices directly affect whether your images survive the transition from screen to print. Medium format cameras are the preferred choice among professional automotive photographers because they deliver the resolution and tonal range that large-format print demands. Brands like Phase One and Hasselblad produce medium format systems that capture detail at a level that 35mm full-frame cameras cannot match at equivalent print sizes.
Here is a practical equipment and settings framework for commercial automotive work:
- Camera body: Use a medium format system for hero shots and full-page spreads. A high-resolution full-frame DSLR or mirrorless body works for detail shots and secondary deliverables.
- Lens selection: Use tilt-shift lenses or high-quality prime lenses in the 50mm–90mm range to minimize perspective distortion. Wide-angle lenses exaggerate proportions and rarely serve the vehicle well in print.
- CPL filter: Mount a high-quality circular polarizer on every outdoor shot and on any studio shot where glass reflections are present.
- Aperture: Shoot between f/8 and f/11 for maximum sharpness across the vehicle body. Wider apertures introduce focus fall-off that reads poorly in print.
- ISO: Keep ISO at the camera’s native setting, typically 100 or 200, to preserve tonal range and avoid noise in large print formats.
- Shutter speed: Use a tripod and cable release. Motion blur from handholding is unacceptable in commercial print work. Shutter speed becomes a secondary concern once the camera is locked down.
The combination of a stable platform, a controlled aperture, and a CPL filter produces images that require minimal correction in post. That efficiency matters when you are delivering multiple formats under deadline pressure.
What are the best post-production workflows for automotive print images?
Post-production for commercial automotive photography is a precise, time-intensive process. The photography-to-final-delivery turnaround on a print-grade automotive campaign typically runs about 10 days. That timeline reflects the careful handling required for reflections, paint finishes, and color accuracy across multiple deliverables.
The most common post-production challenge is reflection management. Reflections that were not fully controlled on set require selective masking, frequency separation, and careful retouching to remove without flattening the paint’s natural depth. This is why locking your outputs first and planning the shoot around fewer car touches and camera position changes is the professional standard. Every unnecessary camera move creates a new reflection pattern that must be addressed in post.
| Post-Production Task | Purpose | Typical Complexity |
|---|---|---|
| Reflection retouching | Remove distracting reflections from paint and glass | High |
| Color grading | Match vehicle color to manufacturer specifications | Medium |
| Composite assembly | Combine hero body, sky, and detail shots into final image | High |
| Format delivery | Export files in correct resolution and color profile for print | Low |
| Consistency review | Verify visual alignment across all deliverables | Medium |
Maintaining visual consistency across a campaign requires building your workflow around a single master color grade. Apply that grade to all deliverables before making individual adjustments. This prevents the subtle color drift that occurs when each image is graded independently.
Studio vs. on-location: which setting works best for print car ads?
The choice between studio and on-location production shapes every other decision in the shoot. Both environments produce excellent results when managed correctly. The difference lies in what you control and what you accept as a given.
| Factor | Studio | On-Location |
|---|---|---|
| Lighting control | Complete, repeatable | Limited to natural light windows |
| Reflection management | Controlled via environment design | Subject to surroundings |
| Permits and logistics | Minimal | Permits, closures, and access required |
| Optimal lighting window | Any time | As short as 30 minutes at dawn or dusk |
| Vehicle safety | Protected floors, controlled access | Weather and surface risks |
| Production efficiency | High, parallel setups possible | Lower, dependent on conditions |
Studio production offers the clearest advantages for print work. Vehicle-friendly studios with cyc walls, adequate door heights, and clean floors allow photographers to control every variable. The Range Rover SV Black campaign used two adjacent studios running concurrently to deliver hero shots, detail images, and composite plates within a four-day production window. That parallel structure is only possible in a studio environment.
On-location shoots deliver authenticity and environmental context that no studio can replicate. The trade-off is a narrow window for optimal light. Outdoor lighting windows as short as 30 minutes at dawn require every camera angle, vehicle position, and lighting modifier to be set before the light peaks. There is no time to problem-solve on location. Everything must be resolved in pre-production.
For campaigns that require both studio and environmental imagery, the most efficient approach is to complete studio work first. Lock the hero shots, establish the color grade, and then use the on-location work to add context and variety within an already-defined visual framework.
Key takeaways
Successful commercial automotive photography for print requires controlled lighting, disciplined pre-production, and a post-production workflow built around locked deliverables and consistent color management.
| Point | Details |
|---|---|
| Pre-production is the priority | Lock shot lists, permits, and deliverables before the shoot day to protect quality and budget. |
| Reflection control starts on set | Shape light sources and environment before capture; CPL filters correct glass and paint reflections in real time. |
| Equipment drives print quality | Medium format cameras and prime lenses in the 50mm–90mm range deliver the resolution print demands. |
| Post-production requires 10 days | Plan for careful reflection retouching, color grading, and composite assembly after a fast shoot day. |
| Studio enables parallel production | Adjacent studio setups, as used on the Range Rover SV Black campaign, allow multiple deliverables on tight deadlines. |
What 35 years behind the camera taught me about print-ready automotive work
The photographers who struggle most with automotive print work are the ones who treat it as a camera problem. They arrive on set focused on settings and gear, and they leave with images that require days of expensive retouching. The real work happens before anyone picks up a camera.
Reflection control is consistently underestimated. I have watched experienced photographers spend hours in post trying to remove a reflection that would have taken five minutes to address on set with a repositioned light or a piece of black card. The vehicle’s surface tells you exactly what is wrong if you look through the viewfinder before you shoot. Most people do not look carefully enough.
Multi-market campaigns add another layer of complexity. When you are producing images for different markets simultaneously, as General Motors did across Latin America, visual consistency becomes as important as individual image quality. A hero shot that looks correct in isolation can look wrong when placed next to a detail image graded differently. Building a single master grade and applying it across all deliverables before making adjustments is the discipline that holds a campaign together.
The pressure in high-stakes automotive shoots is real. A 30-minute dawn window does not negotiate. The only way to manage that pressure is to have made every decision the day before. Camera angles, vehicle position, light modifiers, and contingency plans should all be resolved before you arrive on set. When the light is right, your only job is to press the shutter.
Collaboration between the creative and production teams is what makes this possible. When the art director, photographer, and production coordinator share the same shot list and understand the same final outputs, the shoot runs with a clarity that shows up in the images.
— Ray
How Baldinoautomotive delivers print-ready automotive images
Baldinoautomotive brings over 35 years of professional experience to every commercial automotive shoot, with a track record that includes more than 550 magazine covers and certification from the Professional Photographers of America. Ray Baldino’s approach to automotive commercial photography applies the same controlled lighting, disciplined pre-production, and precise post-production workflow described in this guide to every client engagement.
Whether you are producing a luxury print campaign, a dealership spread, or a multi-format advertising package, Baldinoautomotive has the technical depth and production experience to deliver. Explore the full automotive photography workflow to understand exactly what a professional production looks like from first brief to final file. When your print campaign demands images that hold up at full size, Baldinoautomotive is the studio to call.
FAQ
What is the most important factor when shooting cars for print?
Reflection control is the single most critical factor. Managing reflections through light placement and environment design before capture reduces post-production time and preserves the vehicle’s natural paint depth in the final image.
Do i need a medium format camera for automotive print ads?
Medium format cameras deliver the resolution and tonal range that large-format print requires. For full-page spreads and billboard applications, they are the professional standard, though high-resolution full-frame systems work for secondary deliverables.
How long does post-production take for a print automotive campaign?
Post-production on a print-grade automotive campaign typically takes about 10 days. That timeline covers reflection retouching, color grading, composite assembly, and format delivery across all required outputs.
When should i use a CPL filter for car photography?
Use a CPL filter on every outdoor automotive shoot and on any studio shot where glass reflections are present. The filter reduces glare and improves color accuracy in real time, with results visible immediately through the viewfinder.
Is studio or on-location production better for print car ads?
Studio production offers greater control over lighting, reflections, and vehicle safety, making it the preferred choice for hero shots and primary deliverables. On-location work adds environmental context but requires narrow lighting windows and detailed permit logistics to execute correctly.
Recommended
- How Automotive Photography Works Explained for Photographers
- Hire an Automotive Photographer for Your Dealership
- Automotive Commercial Photography: What Businesses Need to Know
- Vehicle Types That Demand Specialized Photography

